Stamped Valentines Mani


Sup, blog world? Just popping in tonight with a quick stamped mani I did for Valentines Day. 

Polishes used: Lime Crime Lavendairy, Sally Hansen InstaDri Rose Run, China Glaze Dandy Lyin' Around, Zoya Arabella and Pipedream Polish All  These Diamonds (on thumb, see below)

Nobody's putting a ring on it, so I stamped a bow on it.Stamping plates used: Winstonia 102 and FUN9. 

Look, Ma! Just hand!
Okay. That's all she wrote for tonight. Especially since I used up all my *ahem* awesome *ahem* jokes in the captions. 

Go paint your nails!
IndieAmy


Lacquer Legion: Reinvention Challenge

Hello Lovelies!

There is new monthly nail art challenge hitting the streets today.  It is called "The Lacquer Legion" and hosted by four extremely talented nail bloggers: Sarah, Sammy, Rebecca and Leslie.  If you are not following these ladies...remedy that, now!  Each month there will be a new prompt to get your creative nail art juices flowing.  For the first challenge, the theme is Reinvention.  You can reinvent a favorite mani with new colors, reinvent a classic with a new twist or just do something completely new.  All participating nail artist will post their reinventions on January 27th using #LLReinvention on numerous social media platforms.  I think this is a great idea to spark some creativity, especially if you are in a nail art funk!

So for this months prompt, I decided to revisit the mani of mine that has been copied and redone the most by my followers on Instagram.  I was inspired by one of Sammy's tutorials for negative space stripes but did some funky French tips with the idea.  I actually hated this mani at first and wasn't even going to post it.  So glad I did!  For the challenge, I changed it up with some mirrors instead of negative space!


McPolish striped mani, OPI Push and Shove
Top: Negative space striped done in July 2013
Bottom: Mirror striped nails done in January 2014
For both of these looks, I used striping tape to make the clean lines.  The chrome color is "Push and Shove" from OPI's newest Gwen Stefani collection.  This polish is very delicate and requires a special base coat (supplied with the polish) to help give is a smooth mirror finish.  I did give my nails a light buffing to help make ridges less noticeable.  I wasn't going to pick up this polish, but I saw too many cool swatches of it on IG and I am a sucker for good swatches.   Here's some more pics :)

OPI Push and Shove striped mani

OPI Push and Shove striped mani

OPI Push and Shove striped mani
 
Do you plan on picking up Push and Shove?  It is a pretty special polish.  Also, make sure to check out the other #LLReinvention posts on Instagram, Facebook, Twitter and Pinterest.  I can't wait to see what other people come up with!
 
-Amy McG aka McPolish

Flowers and Stripes


Remember a while back when I reviewed some nail polish strips from OMG NailStrips? I recently decided to pull out these strips again (remember that I only used half of each strip for each nail, so I had plenty leftover for this mani)! This time I added some red shimmery flowers to break up the stripes and a matte top coat. I loved the mix of stripes so I did my best to recreate it.

Sadly I can't remember which red I used for the petals (I have so many reds sitting around on my polish desk that I just grabbed a random red) but the yellow is Cult Nails Feel me Up. I started by drawing the simple flower using a thin paintbrush, then added the yellow dot to the center with one of my large dotting tools. This was extremely easy and I got so many comments about my unique mani!


I really had fun with this one, but let me know what you think about it!

-- Rebecca

Cult Nails must haves!

If you know me well enough, then you would know that I adore Cult Nails polish. My first Cult Nails was 'My kind of Kool aid', I had bought from a blog sale about a year ago. And I am happy to say I now own every single polish they have ever sold. Their formulas are fantastic and most polishes are a one coater.

These two polishes should be staples in anyone's helmer! Today I have Cult Nails Nevermore, accented with Tempest. 


Cult Nail polishes are super creamy and opaque. Seen here is two coats with top coat. 


I added some stars to my mani. These two polishes are perfect for stamping. I think the stars are a great  pairing with black and white nails. 


I used MoYou pro plate 06 for the stamping. If you have not used their plates yet, give them a go. They are fantastic quality and unique. 


What are you favorite black and white polishes?


McPolish's Birthday Stamping Adventures

Hey all!

So, my birthday was last week.  Yep...another year older and my fourth 29th birthday (ha!).  I wanted to wear something super-duper awesome on my nails for the day, so I did some epic stamping.  This technique has many different names: advanced stamping, reverse stamping, stamping decals, I can't believe these are really my nails stamping.  Take your pick!  For this mani, I did the decal method.   I think Chanfie at Indian Ocean Polish has a great tutorial on this method, definitely check it out.

So on to the birthday mani!  I used OPI "Fly" for the base.  It is a gorgeous teal that really goes on smooth.  This polish was from the Nicki Minaj collection.  On my pinky, I used Freak Show Polish "Virgo", which is a microglitter textured polish.  Using the stamping decal method, I created the cool designs on my thumb and ring finger with MoYou London "Explorer 03" plate.  This is my most favorite stamping plate ever!  It has so many designs just begging to be made into stamping decals.  If you have not had the chance to experience MoYou London plates...put them on your wish list and bite the bullet for shipping.  They are absolutely worth every penny! 


MoYou London Explorer 03 plate


Ok...enough jibber-jabber and onto the mani!  I really, REALLY loved this manicure and would recreate it over and over again.  Do you love it?

McPolish advanced stamping

McPolish advanced stamping

McPolish advanced stamping


I am currently holding a birthday giveaway on Instagram which ends on January 28th.  If you would like at chance a fabulous indie polish and your very own MoYou London plate, check out my page and do your best "McPolish Pose".

Would you guys like a tutorial on advanced stamping?

-Amy McG

NerdLacquer I Aim To Misbehave

I'm sure by now most of you have heard of NerdLacquer polishes! NerdLacquer was one of the first indie brands I discovered, and I immediately fell in love with the names of the polishes. At that time, the brand was unavailable, so it took me quite some time to actually try the polishes. Unfortunately, the maker of NerdLacquer does have a very bad reputation for disappearing from the internet-world and not taking care of her business. Customer service is nearly non-existant, and I know some people never received orders (if you want excellent customer service check out Cult Nails). That being said I've never personally had any issues with NerdLacquer, and I just love my polishes, so this is an objective look at the polish and its quality!

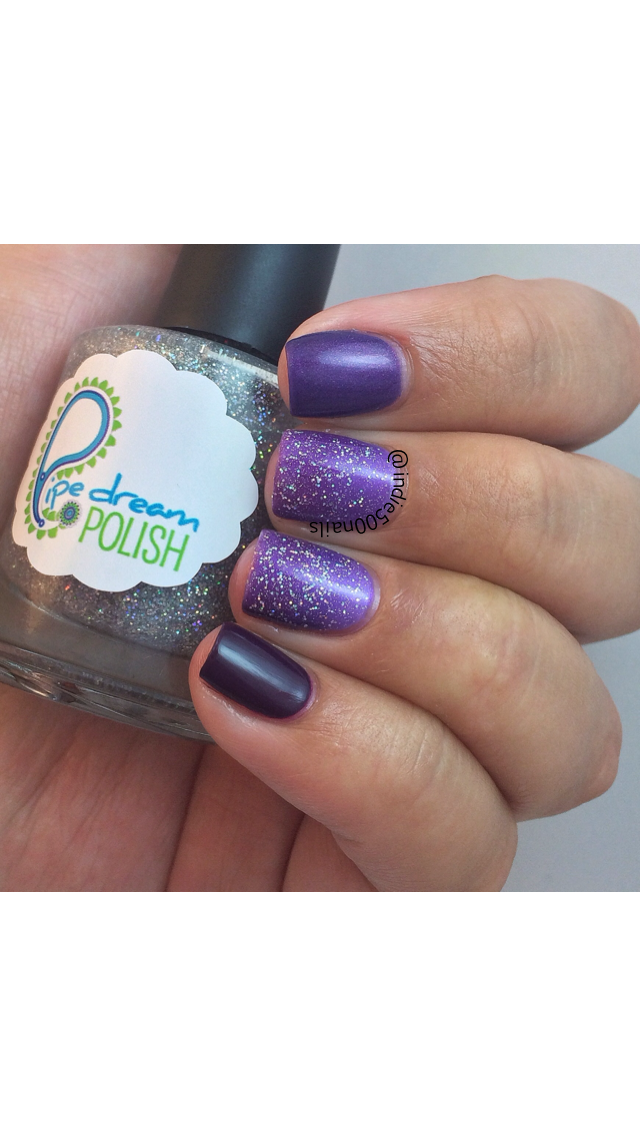
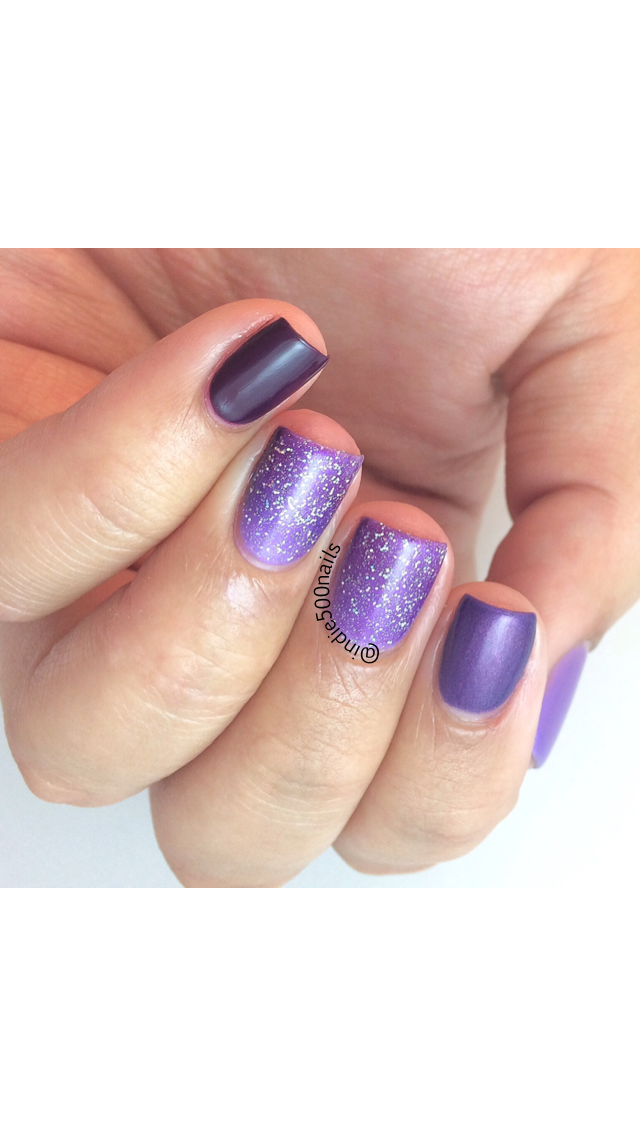
NerdLacquer I Aim to Misbehave is named for the cult classic Serenity and is visually one of my favorite NerdLacquers. I was somewhat skeptical of these polishes at first since they don't seem like anything out of the indie-ordinary, but they truly are. I Aim To Misbehave is shimmery violet burgundy base with some small multicolored glitter.

The formula was good, a bit sheer, but I got away with two coats (it may require three coats if your nails aren't total nubbins like mine are right now). One of the best things about NerdLacquer polishes is the fact that this only required one coat of topcoat for a glass like finish. I'm not sure if NerdLacquer uses thinner glitter, or a thicker base than most indies, but either way I never have to use more than one coat of top coat to smooth out even the craziest glitter bombs. NerdLacquers also wear like iron for me, going days without chipping or tip wear. I can't help but love the polish.


NerdLacquer is one of those brands that you either love them or you hate them, I'm just lucky enough that I haven't had a bad experience!

-- Rebecca

Just Another Mani Monday

Happy Monday, lovelies! And Happy MLK Jr. Day! I wouldn't ordinarily post two days in a row, but I didn't have a title pun for Tuesday, so off we go :)

I have a quick mani to share today. I was on Instagram earlier and saw my sweet friend Deliah 's adorable Valentine's Day notd. I still have some residual mani block, but I wanted to try my hand at that cute little love letter accent nail. Et voila. I made it so.

Colors used: Sation Delete Your Junk Male (pink), Digital Nails Sparkle Franken (middle finger), Cult Nails Tempest and black striper. Random heart glitter was in my nail art stash, I have no idea from whence it came.


And that's all she wrote for today. Just a snippet really. Hope you have a fantastic, four-day work week. 

S.W.A.K.,
IndieAmy 

The Color Purple

Come for the Alice Walker reference, stay for the manis. That's how I roll. Sorry for being AWOL, new blog friends! I've been in a bit of a mani slump. Don't you just hate it when that happens? But now it's lazy Sunday and I finally have a mani to share! So let's hop back on the polish pony.

I don't know if any of you shopped the recent Cult Crypt sale, but I sure did. To the detriment of my wallet and the delight of my inner Cultie, I shopped that sale and then shopped it again (true story, bros). The first of my orders arrived Friday and I rescued it from the office yesterday. Fast forward to today and it was finally time to play with my new purple polish babies. I couldn't decide if I wanted to do an ombre mani or a gradient mani, so I took the easy way out and did both.  Here's the base:


I used Charming on the thumb, Flushed on the index finger and Vicious on the pinky. Double accent nails are gradiented with all three. 

The gradient was fairly subtle and I wasn't totally in love with it. So I went back to the very first rule in the nail girl handbook: when in doubt, ADD GLITTER. 
That magic in a bottle is Pipe Dream Polish All These Diamonds. And it. is. stunning. The cardinal rule of nail girls has never steered me wrong. And this time was no exception.

Here's my favorite shot of this mani. 

And, because I still feel slightly remorseful about slacking on my collaborative blogging responsibilities (though I did leave you in the excellent and perfectly polished hands of Bec, Gari and McAmy!), I have a parting macro shot. 


Flushed. Wowza!


And that'll do it for me for today. Hope y'all have a fabulous three-day weekend and get lots of polish playtime in!

-IndieAmy


My Revlon Parfumerie Picks

I am sucker for a sale.  So when Walgreens had a Revlon sale last month, I chose a few of the new Parfumerie polishes to play with.  Typically, I try to stay away from scented polishes, but I had read some good reviews of this collection.  Overall, these polishes had a pleasant scent and was not overpowering in the slightest.  Some reviews stated that the scent was lost once a top coat was applied, but that was not the case for me.  I will be sharing my three picks from this collection with you today: Italian Leather, Apricot Nectar and Autumn Spice.

Revlon Parfumerie


This post is picture heavy, so be sure to click on through for all the swatch goodness.  (And some awesome macro shots!)

Girly Bits Wave the Sales Multichrome

Multichromes might just be my new thing. I love all things sparkly and can stare at my nails looking at the reflections. But this is completely new and different and I love it. So many different color combinations. I took about 30 pictures and could not capture all the colors this polish morphed in to. Look at the bottle shots in the photos. I could count about 10 different colors I saw throughout the day.


This is two days worth of wear in this picture. Three thin coats with one coat of HK Girl top coat. I wasn't going to use a top coat but the polish took forever to dry!


I tried to take multiple photos at different angles but it would only capture a few of the colors since I did not change the light source.


This probably has to be one of my favorite polishes to date. Definitely one to stare at!


Girly Bits is based in Canada and the ships to the US and beyond. It can also be found at my favorite stockist Llarowe.

Thanks for checking it out! -Gari Margarita_onthe_rocks

Emily de Molly Where Boys Fear to Tread Swatch!

If there's one thing I love, it's a good holographic polish. When I first started getting interested in polish I was crazy for shimmers, but now it's my holos that get the most love. Some of my favorite holos are from Emily de Molly, an Aussie indie brand. Emily de Molly holos are colorful, and intense linear holographics! Where Boys Fear to Tread is no different!

Emily de Molly Where Boys Fear to Tread is a hot pink linear holographic. The formula on this is excellent, and the same as my other Emily de Molly holos. These polishes are opaque in two coats and the balance between the base color and holographic pigment is perfect for me (I like holos that aren't so jelly-like that they are sheer, but not loaded with holo pigment so that they just look silvery and chalky). Where Boys Fear to Tread wore really well and I can usually go a few days without any chips (which is a big deal to me).

I think these pictures speak for themselves! This is two coats of Emily de Molly Where Boys Fear to Tread with Seche Vite topcoat under my daylight. In the sun these are even more stunning!


What brand makes your favorite holographic polish? Do you prefer a different finish of polish?

-- Rebecca

Smokey Mountain Lacquers - Naughty Collection

McPolish here!  And I have come swatches to share with you all.

I found Smokey Mountain Lacquers on Instagram last fall when Kim first opened shop.  I was very pleased with my first purchases from her.  So when Kim was looking for swatchers, I jumped on the opportunity.  So here is the most recent addition to the family, The Naughty Collection.  This trio of polishes is perfect for Valentine's Day.  


First, we have Afterglow.  This is a soft, white crelly polish with a subtle pinkish/purple shimmer.  I used three coats in this swatch for full opacity along with a top coat.  I really like the softness of this white! It was not too stark and the shimmer gave it a little extra something.

Smokey Mountain Lacquers Afterglow


Next up is That's the Spot, a raspberry/fuchsia polish is a mild holographic shimmer.  This is not a strong, in your face holo but it gives it just enough to be special and stand out from your classic shimmers.  I wore with all day and got several compliments.  In this swatch I used two semi-thick coats with a top coat.

Smokey Mountain Lacquers That's the Spot

Smokey Mountain Lacquers That's the Spot


Lastly, we have Make Me Blush.  This was my favorite out of the trio.  Make Me Blush is a soft pink shimmer with darker, hot pink flakes.  The flakes were very small, more like flecks really.  I am not much of a pink polish girl, but this is my kind of pink polish!  Just beautiful.  I used to easy coats and a top coat in this swatch.

Smokey Mountain Lacquers Make Me Blush


You can purchase this entire collection for $25.65 or each polish separately from both the Smokey Mountain Lacquers site and Etsy shop.

-Amy McG


Crashing Wave Nail Art

After all of the fun introducing our newest bloggers, today you're back to boring old me with some easy nail art. ;)

The idea for this mani idea started when I saw some stunning wave nail art, first from a french blogger La paillette frondeuse, then from the fabulous Nailasaurus. I was definitely inspired and wanted to create my own ocean nails as a hybrid between these two gorgeous looks. It's about time I did some ocean-themed nails, I am a marine biologist after all. ;)

I started with a base coat of piCture pOlish Ocean. The scattered holographic in Ocean makes it a perfect water base color. This was actually a mani that was several days old and was starting to show a bit of tip wear, what a great way to refresh a manicure! Following the Nailasaurus, I haphazardly sponged on a lighter blue (Deborah Lippmann Let's Hear It For The Boy) and a white (Cult Nails Tempest).

The crashing waves is definitely one of my most successful and easiest nail art adventures yet. Since crashing waves are very abstract, there is no right or wrong. All I really did was dab some polish on the tips of my fingers and voila, waves!


I can't wait to wear this mani somewhere to show it off! My fellow marine biologists are going to love it. What's your favorite simple nail art look?


--Rebecca

Winter glitter gradient

Hi Girls!
              
Today I have a real simple mani to show you. When I'm in a fliipin hurry I like to do something easy. A glitter gradient is my go to when I have a short amount of time. I am a working mom with two kids (husband and daughter). HA! It is sometimes difficult to find time for myself, especially during the week. Who's with me!? I got some shiny goodness today!


My base is Ethereal Lacquer Gilded Zion. This is a cool white holographic polish with subtle gold shimmer. It reminds me a duo chrome polish because you can only see the gold shimmer at certain angles and lighting. Seen here is 3 thin coats.


I think this color is great for winter and would have been perfect for New Years!


I topped my mani off with Black Cat Lacquer Moonchild. It’s a glitter bomb filled with holographic, iridescent and matte glitter. Circles, hexes and moons a plenty! I had no problem getting glitter onto my nails. I did have to fish for a few crescent moons but that was it.


Here is a macro shot I took of the bottle. Look at all that glitter! Props to Black Cat lacquer for never skimpin' on the glitter.

Shop links...